- Published on
手动实现一个简单的MCP Server及原理(Cursor版)
- Authors

- Name
- Billy
手动实现一个简单的 MCP Server 及原理(Cursor版)
实现步骤参考 MCP 官方教程,配合 Cursor,原理分析部分基于 Cloudflare 拦截大模型请求行为。
一. 手动写一个 MCP Server(Windows 为例)
1. 安装 uv 包管理器
powershell -ExecutionPolicy ByPass -c "irm https://astral.sh/uv/install.ps1 | iex"
2. 初始化 Python 项目
uv init weather
cd weather
uv venv
.venv\Scripts\activate
uv add mcp[cli] httpx
new-item weather.py
3. 构建服务器(weather.py)
from typing import Any
import httpx
from mcp.server.fastmcp import FastMCP

mcp = FastMCP("weather")
NWS_API_BASE = "https://api.weather.gov"
USER_AGENT = "weather-app/1.0"
4. 定义辅助函数
async def make_nws_request(url: str) -> dict[str, Any] | None:
    headers = {
        "User-Agent": USER_AGENT,
        "Accept": "application/geo+json"
    }
    async with httpx.AsyncClient() as client:
        try:
            response = await client.get(url, headers=headers, timeout=30.0)
            response.raise_for_status()
            return response.json()
        except Exception:
            return None

def format_alert(feature: dict) -> str:
    props = feature["properties"]
    return f"""
Event: {props.get('event', 'Unknown')}
Area: {props.get('areaDesc', 'Unknown')}
Severity: {props.get('severity', 'Unknown')}
Description: {props.get('description', 'No description available')}
Instructions: {props.get('instruction', 'No specific instructions provided')}
"""
5. MCP 工具函数定义
@mcp.tool()
async def get_alerts(state: str) -> str:
    url = f"{NWS_API_BASE}/alerts/active/area/{state}"
    data = await make_nws_request(url)
    if not data or "features" not in data:
        return "Unable to fetch alerts or no alerts found."
    if not data["features"]:
        return "No active alerts for this state."
    alerts = [format_alert(feature) for feature in data["features"]]
    return "\n---\n".join(alerts)

@mcp.tool()
async def get_forecast(latitude: float, longitude: float) -> str:
    points_url = f"{NWS_API_BASE}/points/{latitude},{longitude}"
    points_data = await make_nws_request(points_url)
    if not points_data:
        return "Unable to fetch forecast data for this location."
    forecast_url = points_data["properties"]["forecast"]
    forecast_data = await make_nws_request(forecast_url)
    if not forecast_data:
        return "Unable to fetch detailed forecast."
    periods = forecast_data["properties"]["periods"]
    forecasts = []
    for period in periods[:5]:
        forecast = f"""
{period['name']}:
Temperature: {period['temperature']}°{period['temperatureUnit']}
Wind: {period['windSpeed']} {period['windDirection']}
Forecast: {period['detailedForecast']}
"""
        forecasts.append(forecast)
    return "\n---\n".join(forecasts)
6. 设置入口函数
if __name__ == "__main__":
    mcp.run(transport='stdio')
二. 在 Cursor 中使用 MCP
1. 更新 Cursor 至最新版
2. 设置 MCP Server
- 打开 Cursor 设置 →
MCP Server - 点击
Add new global MCP Server - 添加如下 JSON(路径需为绝对路径):
{
  "mcpServers": {
    "weather": {
      "command": "uv",
      "args": ["--directory", "/ABSOLUTE/PATH/TO/PARENT/FOLDER/weather", "run", "weather.py"]
    }
  }
}
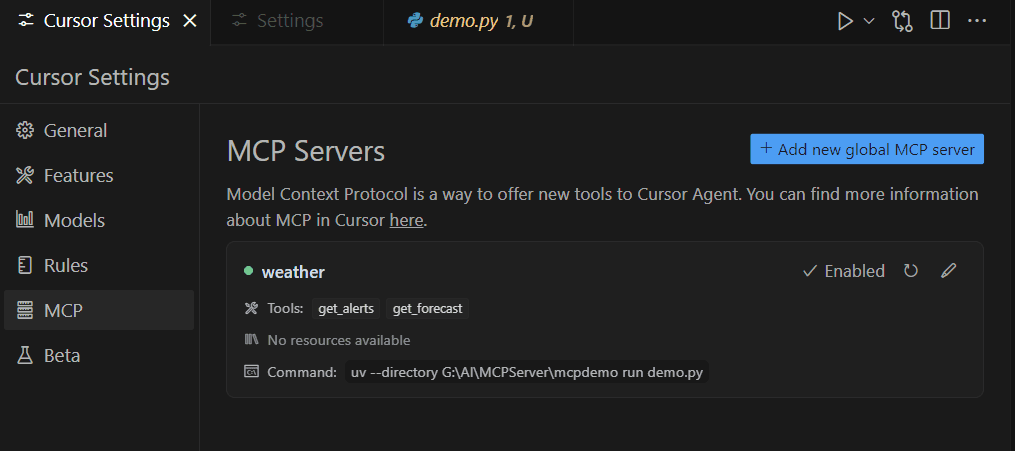
3. 成功效果
- MCP Server 显示为绿色
- 可见 tool 列表
- 可与 GPT-4o 联动测试
三. 原理解析
总体流程理解
MCP 的核心思想是:将 prompt 与工具信息一并发送给 LLM,由 LLM 决定调用哪个工具和参数,MCP 客户端负责调用实际函数并返回结果。
用户输入 Query
        │
        ▼
MCP 客户端构造请求(Prompt + 工具列表)
        │
        ▼
       LLM
        │
        ▼
解析 Prompt,返回工具名 + 参数
        │
        ▼
MCP 客户端通过统一接口调用对应工具
        │
        ▼
     工具执行并返回结果
示例代码片段(客户端调用逻辑)
# Step 1: 构造消息
messages = [{"role": "user", "content": query}]

# Step 2: 获取可用工具
response = await self.session.list_tools()
available_tools = [{
    "name": tool.name,
    "description": tool.description,
    "input_schema": tool.inputSchema
} for tool in response.tools]

# Step 3: 发送到 Claude API
response = self.anthropic.messages.create(
    model="claude-3-5-sonnet-20241022",
    max_tokens=1000,
    messages=messages,
    tools=available_tools
)

# Step 4: 处理 LLM 返回内容
assistant_message_content = []
for content in response.content:
    if content.type == 'text':
        assistant_message_content.append(content)
    elif content.type == 'tool_use':
        tool_name = content.name
        tool_args = content.input
        result = await self.session.call_tool(tool_name, tool_args)
以上就是完整的 MCP Server 构建教程和调用原理分析。